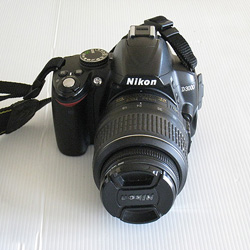
 Food photography is not that hard. But first a disclaimer right up front – I am not an expert photographer who knows all the little buttons and settings on their camera. I have an old camera, a Nikon D3000, and I know as much as is necessary to take reasonable photos. If you think you will one day read the whole camera manual and learn it all so that you can take fantastic photos, you are fooling yourself. It will never happen. It is too overwhelming. I do actually understand the science behind what I am doing but you really don’t have to know why it works – just take my word for it. Only use the camera manual to find the following things if you don’t know where they are. Then put it down. Get these few settings right and the technical side will be taken care of. Then it’s up to you to make good food, present it well and set the stage. The following steps are how I take photos.
Do these things in this order.
1. Get your camera off auto!! Now!
All cameras are different so I can’t tell you exactly where everything is for your camera. Usually there is a wheel on the top with things like A, M, S, P and various other symbols on it. Put it on M – and leave it there, for eternity.
2. Turn the ISO to its optimum settings.
Find the ISO settings, usually in your menu. The higher the number the more light will enter your photos but they also get grainier and we don’t want that. We will get light in a different way. ISO of 100 will give you clear, ungrainy photos. Turn it to 100 and leave it there. Some cameras might show the ISO in a different way but just make sure it is at its optimum settings which should be a low number.
3. Get your White Balance right!
Most food blogger photos I see have terrible white balance. They usually look yellow. Go to your menu and choose the appropriate setting. Auto works quite well, but if you want more control, you can use cloudy or sunny – even for inside. I don’t tend to trust the other inside light settings but you can play with the effect of each one if you like.
4. Aperture is the bomb!

Have you ever wondered how some photos you love have that blurry effect in the background and also sometimes in the foreground? That is done with aperture. So, find your aperture settings – they should have an F before them and look something like this: F1.8 or F5.6 etc. The lower the number, the less of the photo that will be in focus, which is great for zeroing in on one aspect of the food. The rest will be blurry, which is a lovely contrast. But, if you want most of your setting to be in focus, then make that number higher. I usually don’t go above F5.6 so there is still some blurriness in the background. Play with it. But the important thing to know is that the smaller the number and therefore the smaller the focused area, the more light will get into your camera, which is what you want if you are inside on a cloudy day with poor light. But don’t worry if you want more of your food in focus and so want to use a higher aperture number – we have one more thing to control that light…
5. Shutter speed – this will make your day!
The slower, the shutter speed, the more light will enter your camera. I have taken photos at dusk when those around me think I am crazy for shooting a photo without a flash. But the photo looks like it was shot in bright sun. YOU MUST HAVE A TRIPOD for this to work because you could never hold your camera steady enough for long enough. At a very slow shutter speed, you might think your shutter has got stuck but it will eventually click. It has needed all that time to gather the light together. Amazing really.
Now point your camera at what you want to photograph,  focus it on the point you want the sharpest (if your lens does not allow autofocus), look at the light meter on your camera screen and move the shutter speed wheel until all those little dashes go away and you have it on zero. Take your photo. It there’s lots of light in the room, the shutter will click quickly. If there is little light, there may be a delay before it clicks. Don’t touch it thinking there is something wrong. Be patient. Now, check your photo. If it looks a little too bright, move the wheel a little to the right to the darker side and try again. Or conversely, if it is too dark, move it to the left. Experiment.
After doing all this, I challenge you to tell me your photos aren’t better. They might not be fantastic because you still have to work on the presentation side of things, but the technical part will have been taken care of.
Your camera will be different to mine but the basics are the same with every camera so good luck finding these settings. It will be well worth your while to get your camera set up once and for all. After that, the sky is the limit.
Article by Suzanne Perazzini
If you want to see how I take photos at night, here is my set up.
Two great books on photography are: Pinch of Yum’s “Tasty Food Photography”
And Spicie Foodie’s “Yummy Pics: A Food Blogger`s Guide To Better Photos”.


I’m so happy that you posted this! You have no idea how badly I needed to read something like this right now. Thank you!
You’re welcome. Do ask if you have any more specific questions.
Great tips! The tripod one is particularly important – so many people seem resistant to use them. Tripods are the single thing that will improve most people’s photography, IMO (although white balance is a close second).
I have no idea why they resist a tripod when it is one of the best things they can do for a clear photo. I even use the time delay to make sure it is rock steady.
So helpful! I’m still working through a high-end point and click, so my aperture is sadly not very precise. But I love reading tutorials like this, in the someday hope that I’ll graduate to a DSLR and will instantly be a photo-taking-whiz-kid (girl can dream, right? 🙂 )
If you use a point and click, it is more important to use as much natural light as you can and never use overhead lights. They ruin photos. Oh, and never a flash either. Follow those few things and you will still take decent photos with a point and click.
Best photography tips ever!! Thank you!
Thanks, Jolene. Glad to be of help.
Thank you Suzanne!! I appreciate your tips – and yes my camera is NOW on M 🙂 Now to build more confidence!
Congratulations, Hayley. That is the first step. Now don’t slip backwards and hit that auto button! Good luck.
Great tips, Suzanne. I also take photos at dusk or twilight as it seems to take me all day to get to the photography part of being a blogger. It’s always a thrill to see how bright they can turn out even with night-time falling xx
Surprising isn’t it? The marvels of a DSLR camera. I also take way too long to get to the photography part. I need the kitchen all spic and span before I do them.
Your photos are always wonderful. Great tips! I have resisted using my tripod because the bracket covers the door to get my chip out and I find it inconvenient.
Thanks you, Karen. That’s very sweet of you to say. My bracket covers the battery but it is not that difficult to remove it. The benefits are enormous and so worth it. Especially for you at the moment in the middle of winter. Using these tips and especially a tripod so that you can slow down the shutter speed to capture the light will make a world of difference.