When I first decided to do this cooking blog, it was summer and the sun stayed blissfully visible until late evening. Light wasn’t an issue. But the days got shorter and shorter and shorter until darkness had descended upon the dinner making and photographing process. Now it wasn’t just a matter of grabbing the camera and snapping a few shots. The light was a major issue and it all took time. Too much time for the food to stay warm. And too much time to keep the hungry mouths quiet.
So, I had to sort the process and streamline it.
LIGHTING
The first thing I did was to go on Trademe (the New Zealand equivalent of Ebay) and I bought two lights on stands with lightboxes to diffuse the light. I didn’t know if this would work but I had studied the issue at length and in the end my son told me to get on with it and take action. So I bought these and, miracle of miracles, they work brilliantly.
I place one on either side of the food and turn all the lights off except these two and the lighting is perfect with almost no shadows. Lighting problem solved. These stay in the living/kitchen area and so far, no one in my household has complained about them and they are right there when I need them.

CAMERA
When I started, I had a point and shoot camera and was reluctant to spend the money necessary to get a DSLR just in case this was a fad which I would get bored with when it all got too hard. But the frustration was enormous. My little number had no aperture control and I so wanted to get that soft, fuzzy background that makes you oh and ah at photos. My son put heaps of cameras on the Trademe watchlist and after a softening process (lots of mental self-talk), I took the plunge and bought a Nikon D-3000. My photographs improved overnight.
Okay, so I had to learn a few extra bits and pieces to be able to control this nice new beast but it didn’t take long. At the end of the day, all you need to conquer is ISO, aperture and shutter speed. Those three give you heaps of control over the end result. There’s a lot more my camera does but for now I don’t need to know that. And it’s important not to get so overwhelmed that you chuck it all in.

SET UP
When I decide it is time to cook dinner, I gather together what I need before I start. Apart from the lights which stay in the kitchen/living area, I keep the rest next door in my study. I carry out my tripod, camera, backboard and underboards – for me these are white foam boards I got free from work. I love to work with the simplicity of a neutral background and focus on the colour, shape and texture of the food. I occasionally vary this but keep coming back to the simple approach. I don’t set these up yet but leave them nearby. I don’t want them underfoot while I cook.
Now I cook dinner. I try to choose dishes which leave you a little set up time towards the end – like a pie cooking in the oven. But this doesn’t always work and all hell breaks loose at the last minute. Cold dishes are perfect because then the only pressure is the grumbles and mumbles from the whiney people in the house. Anyway, in that little break, I haul everything into place – the lights, boards and tripod/camera. Now, of course, I trip over everything while I am trying to finish off the last of the cooking and plating up but that can’t be helped. I set up the scene the way I want it (see next section) and take a few shots without the food to get the lighting and camera settings just right so I am not fiddling while the food is getting cold.


COMPOSTION
Let me first say that I decide what to cook the night before or in the morning before going to work and then write out a shopping list for my husband. He does the shopping on the way home.
During the day at work, when time allows, I think about how I will layout the finished dish – in a plate, still in its original container, straight onto a board, in two dishes etc. I think about what props would be appropriate but I don’t use a lot – that simplistic look I am going for requires little else but the food. As soon as I get home, before exercising, I look at a few of the food photography sites like Foodgawker and Taste Spotting to find a look I like for that particular dish – I use the search function. While I exercise (exercycle for half an hour) I consolidate my ideas and by the end, I have a fairly clear picture of what I want the finished photos to look like. There isn’t enough time for experimenting with different props and dishes so I try to get this clear in my mind.
So, when the food is ready, all I have to do is put my plan into action and start snapping away. I move the tripod settings up and down to have a few different angles to choose from and I move the food about to try different plate and food angles. I end up taking a lot of shots but I seldom change the setting unless I have really messed up and my plan is not working.
If I am cooking a dish that requires something like a poached egg on top, I will only do the one and photograph that and then get rid of the photography gear and finish off the others so not everyone has a cold egg, only me.
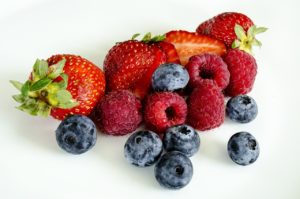
Here are a couple of the results using this set up. I’m not saying these are perfect because I have heaps more to learn but at least they were accepted by Foodgawker and I was happy with them.


Hi Suzanne,
Great tips and tutorial! I love your setup too, it’s so professional. Your photos look fantastic:)
Thanks, Nancy. My set up is getting there but lacks the variety of props and different boards. I also need to get a better lens for greater depth of field. Bit by bit though.
Suzanne
WOW! Those light boxes are huge! They do work beautifully, but I don’t have the space for that. I’m just thankful that it’s summer and I won’t have to struggle with lighting for a few months!!
I agree about the beauty of shooting in sunlight, Laura. What bliss! The lights are huge and have to stay in the living area because they are too big to haul into my study each night. They have become like an industrial sculpture and have actually become a topic of conversation when someone visits. They start discussions in areas of food, photography and blogging that might never have otherwise happened. So I guess, in that way, they have added something to our lives.
Suzanne
What a great post! I love those lamps! I need to move to a bigger place to have room to store them first, but I think I certainly need those – we have so little day light here, it’s all rain and gloom. And tiny windows – one more reason to move :-). Your photos are so sharp and beautiful – your technique definitely works!
Thanks, I am still working on the technique and not every photo is a success so I’ve a long way to go yet but it is certainly a joy when a photo works well. I have seen people use a white reflector umbrella and a strong light shining back into it to bounce light back at the food and a white reflector board on the other side. That is an arrangement which would take up less space as the umbrella can be folded away. I must admit I was a little surprised at the size of the lights when they arrived by courier.
Suzanne
Nice camera. A Nikon is on my wish list. I am using a point and shoot and it is driving me crazy. I wish they wouldn’t cost so much. How did you decide to get the Nikon 3000? I get so confused when shopping for a camera.
Vita, the point and shoot I was using was driving me crazy too. That’s why I let my son persuade me to buy a DSLR so I would stop complaining. He is doing an arts degree specialising in photography right now and has been a great help with advice. He told me to choose the Nikon D3000. As I said above, I bought it second hand so it wasn’t too dramatic but it did take me a while to decide to do it. But I have never looked back. It has made such a difference to my photographs. It comes as a standard with a 18-55mm lens which can zoom in and out but the aperture only goes to f3.5 so I have just bought another lens – 50mm f1.8, which is much better for zeroing in on something small like a cookie and making the rest fuzzy – so pretty. Otherwise the standard lens does really well for most food photos.
There are of course plenty of other choices for a decent starter camera but this one is working out for me. You have to be aware though that you have to look through the view finder on the D3000 as the screen only displays data. It took a little while to get used to but now I’m fine with it.
I hope that has helped and good luck with your photography.
Suzanne
Some really great tips, I tend to sling the dish on the windowsill at the moment or on our dining room table! I’m not sure that some diffusers would last long in our house mind, not with my 2 year old hanging on my leg saying “Mummy! Tea!”
It must be super difficult trying to photograph with a 2 year old. They don’t exactly like the focus to be off them. We food photographers have our crosses to bear and it’s usually a hungry family.
Suzanne
1. You wrote my thoughts. I am trying to get brave enough to publish.
2. Thanks for writing this. I always think how generous of you to let us get a peak at the mechanics of it all.
3. The reason no one complains is because boys/men love photography toys, so those lamps are like artwork in the living room.
4. Just Thanks.
I’m glad this was of some use to you, Madonna. You could be right about the lamps.LOL.
Suzanne
Hi! A question; how many watios have your flash light?
I don’t ever use a flashlight when photographing food. It flattens too much.
This is sooo helpful. Thank you for detailing this process. Can’t wait to try it.
Glad to be of help, Andrea. I did a follow up post on the basics of a DSLR camera in case you didn’t find it: https://www.strandsofmylife.com/5-easy-steps-taking-amazing-food-photographs/
Thank you so much for this generous information. I also have a Nikon D3000 but it has sat on my cabinet for years because I was too intimidated to use it. Your post has really inspired me to take it up and start using it to take photos for my blog, because my point and shoot just doesn’t do what I need it to do.
I am glad the information has inspired you. DSLR cameras can be intimidating but just use the functions you need and ignore the rest so you don’t get overwhelmed. They make an enormous difference to photos. Good luck.
Hey there, this is a really fantastic post. Very helpful! I am a keen food photographer, but am bit overwhelmed by the cost of equipment. As I am in the depths of winter and in the country Natural light is not even a question. I was wondering what do you recommended as essential equipment. And I was wondering what lights are you using?
Much appreciated
Lindsay
I bought the lights from Trademe, which is like Ebay in the US. You can actually get away with just one by using a reflector on the other side. So, the equipment you need is a reasonable camera, a light and a reflector. That’s all. The camera is the most expensive item. The reflector and light were relatively cheap. Good luck.